background

Showing posts with label cake topper. Show all posts

Wednesday, April 24, 2019

Non-Traditional Cake Toppers

The wedding cake topper became popular in the 1950's. It was a traditionally dressed bride and groom that symbolized togetherness, and it's one of the items from the wedding that's put in the treasure chest and kept for years to come. These days, it can still be a treasure that's kept for years to come...but the design and creativity has blossomed into some amazing creations!

Flowers are always a favorite wedding cake topper for brides! While fresh flower cake toppers aren't something that's normally saved (though it is possible), it does make for a beautiful display at the reception! Sugar flowers are an alternative to fresh flowers, but sometimes they can end up more pricey depending on the complexity.


Themed and seasonal cake toppers are also a popular choice and are something that can be kept as a memento after the wedding. No matter what your theme is, you can find a creative and eye catching cake topper to top it off!


While the bride and groom cake topper is still a traditional choice, couples are personalizing the toppers more and more! Funny poses, bobble heads, sports teams and other personalized details are something we've seen our couples choose....


Photo by Terra Sol Studio


Photo by The Mamones


Wednesday, December 13, 2017

Wedding Details :: Scrabble

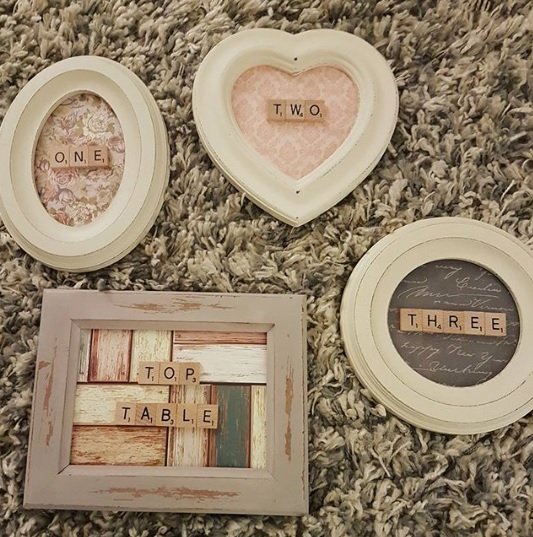
If you're a Scrabble enthusiast and want to include that love in your wedding day, there are a ton of creative and eye pleasing options to consider! Centerpieces, table names/numbers, invitations, cake topper, gifts...take a look at some of these suggestions, then get creative!


Photo from Style Me Pretty


Photo from Aleman Photography


Photo from k19marshall


Photo from icandothat_design


Photo from hopefarmco


Monday, September 25, 2017

Happy Anniversary :: Jaime + Adam

Jaime + Adam
September 25

Jaime + Adam had a beautiful Jewish lakeside gazebo ceremony and an indoor reception to follow. Jaime chose fall colors for her décor, and it was a perfect choice! A harpist, pomanders down the aisle, and gazebo arrangements were a few of the special touches for the ceremony. Everything turned out just lovely! Happy Anniversary Jaime + Adam, and best wishes to you both!


Photo by Terra Sol Studio

Photo by Terra Sol Studio


Photo by Terra Sol Studio


Photo by Terra Sol Studio

Photo by Terra Sol Studio

Photo by Terra Sol Studio


Wednesday, September 20, 2017

DIY :: Champagne Cork Bride & Groom Cake Topper

Enjoy some champagne, save the corks and paint yourselves as the perfect wedding cake toppers… or save the corks from your wedding reception and paint yourselves as a keepsake! With a few little strokes of paint, you’ll be amazed at how these cuties come to life.


SUPPLIES:
  • Champagne Corks
  • Paint + Brushes
  • Lace, Pearls, Ribbon
  • Black and Pink Sharpie
  • Hot Glue Gun
  • Appetizer Picks (optional)


About The Corks

You’ll want to find Champagne corks that are more “shapely” for the gals and less shapely for the guys. You’ll also want to use corks that have at least part of the cork head free of any writing or text. Some brand logos cover the entire corks. Drink a few bottles until you find the right ones, or just buy a bag of real used corks from Amazon – your choice!


Paint The Hair + Outfits

Mix and match paint colors to get the perfect shade for your cork people. Paint the outfits and hair, letting each coat dry in between. To speed up drying you can hit them with a hair dryer.


Sharpie Magic

Draw on the simple eyes with a black Sharpie and then add a little blush with the pink one.


Add Some Embellishments

Make a little vail or hair piece with lace. Add some pearls or ribbon. Draw on a bow tie and some buttons. The details are up to you!


Cake Topper To Be

If you’d like to turn these into your cake topper, while you can just place them on top of the cake, adding a stick to the bottom will help them stay in place. Drill and insert a cocktail pick or the like.


See the full post at Something Turquoise.


Monday, July 31, 2017

DIY :: Hexagon Photo Cake Topper

I LOVE fun and unique cake toppers. In fact, creating your own cake topper is one of the top 5 easiest DIY projects you can make for your wedding. Why? Let me tell you! It’s a big impact project that you only have to make one of; meaning all your guests will see it and it will be heavily photographed. They also make wonderful keepsakes, especially today’s idea. Although the project itself is quick and easy, you need to account for “dry time”, so plan to start the project on a Friday night and by Saturday afternoon it will be dry and ready to place on top of your delicious wedding cake!


SUPPLIES
  • Color Photo Printer
  • Photo Paper (Canon 8.5″ x 11″ Matte Photo Paper)
  • 5″ x 3/8″ Clear Acrylic Plexiglass Hexagon
  • Dishwasher Safe Mod Podge
  • Paint Brush
  • Scissors
  • Cute photo of you and your fiancé!


SIZE + PRINT
Use your design software of choice to resize your favorite photo, so that it’s a little larger than 5″ at the widest point. Then print onto matte photo paper using your Canon TS9020… looks gorgeous right!?!


REMOVE COATING
Most pieces of acrylic plexiglass come with a protective coating on them which you need to remove, no biggie.

DISHWASHER SAFE MOD PODGE
It’s the one with the turquoise label! You’ll want to use this version of Mod Podge because you will be able to stick it right in frosting and clean it off afterwards!

Center the hexagon on your photo to see where you’d like to place it. Liberally apply Mod Podge to both the photo and one side of the hexagon. Then press the two together! Some little bubbles are ok, try to smooth and press larger bubbles away.

CRAFTERS TIP // Don’t mess, press, or smoosh the photo and acrylic around too much – if you do you could scratch the photo. If you scratch the photo, no big deal, remove it from the hexagon, reprint and start over!


LET IT DRY OVERNIGHT
For this step, since there is a lot of glue, you’ll want to let it fully dry overnight before you move onto the next step. The entire print and glue part is going to take you like 5 minutes, so you can do this any evening you have a few minutes to spare.


TRIM AWAY EXCESS
After the Mod Podge has fully dried, simply cut the extra parts of the photo away, following the line of the hexagon closely. Easy right!?


FINAL SEAL
To fully seal your photo to the plexiglass you’ll need to apply two coats of Mod Podge to the backside, with an hour of dry time in between each coat. Make sure to focus on the edge where the photo meets the plexiglass!

28 DAYS: For this project to be truly dishwasher safe, it needs to cure (or dry) for 28 days. Meaning it would be best if you could make this project 1 month before your wedding. That way when you remove it from the frosting of your cake, you can wash it off and keep it forever!


See the full post at Something Turquoise.


Wednesday, June 7, 2017

11 Alternatives to the Traditional Wedding Cake

In my daily browsing online, I found this on Brides.com and I couldn't agree more!

"We've said it before, and we'll say it again: a traditional wedding cake will never go out of style. But why settle for a classic white confection when your wedding day should be an event that is uniquely yours? After all, you've customized every aspect of your day, starting with a meaningful ceremony and ending with a handpicked playlist of your favorite tunes. And yet when it comes to the wedding cake, couples often forgo personality in favor of tradition."

While I absolutely love the tradition behind the wedding cake, I believe that this is your day and you should spice up the tradition with your own personal twist!


Ice Cream Cake
I've done a few weddings before where the bride & groom chose ice cream cake versus a regular wedding cake. There is more involved with this style of wedding dessert, such as making sure its kept frozen until being displayed and served...but when you see your guests light up for ice cream cake it will be worth the extra planning!


Pies
Pies are a great dessert offering if you don't want to go the wedding cake route. Pies also have another bonus...you can serve many more flavors than you can with a traditional wedding cake!


Oreos
I don't even have words! They make so many different varieties of oreos you could pull this one off so many different ways! And look how gorgeous they stack up! :)


Croquembouche
Croquembouche is a French twist on the traditional cake. Beautiful, delicious and different!


Donuts
Who wouldn't love donuts as a dessert? You can display them in a variety of ways and provide many different flavor options for your guests!


Cupcakes
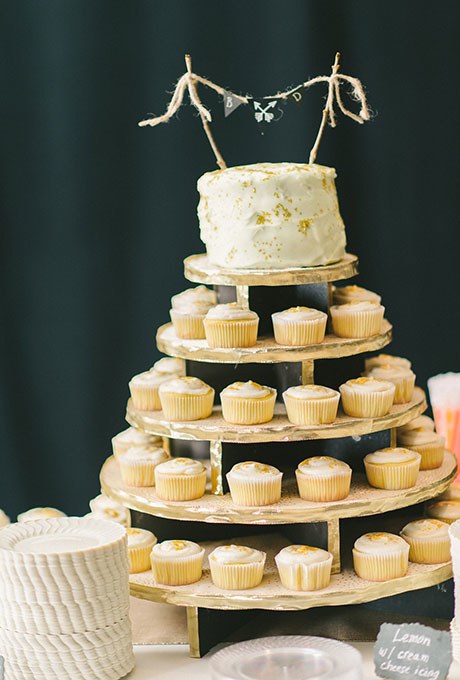
Cupcakes are probably the most seen alternative to the traditional wedding cake. Multiple flavors are available this way, and as you can see you can still incorporate a small cake for the bride & groom to cut.


Cake Pops
These are always so pretty! Different colors, different flavors, beautifully displayed and available for your guests to help themselves!


Rice Krispy Treats
Now this one I LOVE! I don't think I've ever met anyone who didn't like Rice Krispy treats! They can still be fashioned into the style of a traditional wedding cake and easily cut for your guests!


Whoopee Pies
Delicious desserts arranged for your guests to help themselves!


Gourmet Cheeses
Diabetic? Allergic? Not a fan of sweets in general? Go opposite with savory. This cheese tower looks traditional and serves the purpose, but gives the guests something different to munch on!


Pancakes
Breakfast or brunch wedding? Have pancakes instead of cake...or along with the cake! It's perfect!