background

Showing posts with label decorations. Show all posts

Wednesday, April 4, 2018

#DIY :: Printable "Just Married" Banner


SUPPLIES:
  • 8.5″ x 11″ White Cardstock
  • Scissors or Paper Trimmer
  • Hole Punch
  • Yarn or Ribbon
  • Home Printer
  • FREE banner files (link below)


HOW-TO:
  • Download the free banner design at the end of the post by clicking on the graphic
  • Print onto 8.5″ x 11″ white cardstock, there are 4 pages
  • Cut each banner tile out using scissors or a paper trimmer
  • If you’re using the fabulous Crop-a-Dile hole punch you’ll be able to punch holes through all of the tiles at one time
  • Then hang on your choice of ribbon!


Click here for the printable banner tiles.

Original post from Something Turquoise.


Sunday, February 25, 2018

Floral Designs & Décor Rentals from Michéll Events in Dallas

Today I took on the task of taking new photographs of my ever-growing event design inventory! When you hire us for event design (florals, linens, rentals, etc..) you get access to the complete inventory of décor and rental items. Here are a few photos of some of our current items....and there's much more coming soon! Contact us to see everything we can do for your special occasion or event! (469) 475-7089 or info@michellevents.com.

Some of our inventory you see here:


Photo Frames
Vases, Glassware & Milk Glass
Linens, Napkins & Sashes
Lanterns & Lighting
Paper, Artificial & Fresh Flowers
Greenery
Centerpieces
Bows, Ribbon & Jewel Accents
Themed Décor Items
Signs & Displays
Stationery Items
Candles & Candle Holders
Tabletop Easel
Charger Plates
Cake Stand
Champagne Glasses


Wednesday, December 13, 2017

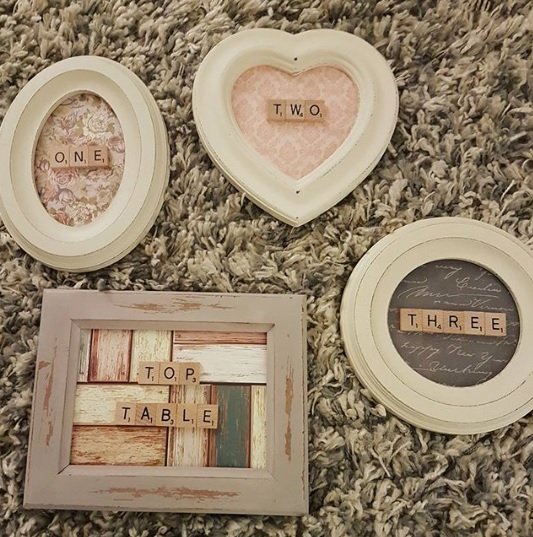
Wedding Details :: Scrabble

If you're a Scrabble enthusiast and want to include that love in your wedding day, there are a ton of creative and eye pleasing options to consider! Centerpieces, table names/numbers, invitations, cake topper, gifts...take a look at some of these suggestions, then get creative!



Photo from Style Me Pretty


Photo from Aleman Photography


Photo from k19marshall


Photo from icandothat_design


Photo from hopefarmco


Thursday, November 2, 2017

Planning Tips :: Wedding Budget Breakdown :: Lighting

Lighting is an element that will drastically change the look of your wedding! I know this will be my longest post yet, because it's my fave! With all of the different aspects of décor you could incorporate into your wedding day, this is always my first suggestion. The suggested amount of your budget to put towards lighting is 5%, so a $20,000 wedding budget would have a $1,000 lighting budget. You can always shift things around with your budget categories if you want to add or take away from that amount.


Photo by Z Media :: Lighting by Michéll Events

Photo by Z Media :: Lighting by Michéll Events


First off, candles are always a wonderful way to add romantic ambiance to your ceremony, cocktail hour and reception without breaking the bank. You can dim the lights in any room and let the candlelight take over! Be sure to verify that your venue allows candles before you plan to go this route. If you're allowed, use them every chance you get!

A professional lighting package will get you some ooh's and aah's from your guests. Spotlights for important things like the dance floor for your first dance and special moments, cake table to highlight the beautiful masterpiece, color wash lighting on the walls to give the room ambiance, and you can even have individual pin spotlights on your centerpieces to highlight them! Adding a lighting package can really add to the wow factor, so look into it any way you can!


Lighting by Michéll Events


A gobo is another great lighting addition you could include. It could be your names, monogram, a logo for your event., anything...and it's displayed on the wall, dance floor, or any other blank surface you want to display your detailed design on. Most lighting companies can provide an in-stock gobo or you can order one personalized with your names or initials.

Lit paper lanterns are a wonderful and inexpensive option for lighting and décor. It creates a great effect and they can be hung over any space or area that you want to accent. Over the dance floor, entry way, cake table, gift table, or a number of other places.

String lighting is another great choice for both indoor and outdoor events. With so many colors and sizes available, you can create some amazing looks with string lighting!


Photo by Rosen-Jones Photography :: Lighting by Michéll Events


Gobo Lighting by Rock the House


Photo by Leach Photography :: Lighting by Michéll Events


:: TIPS ::

1. Check with your venue to see if they offer a lighting package. Some have lighting already installed and permanently in place, but if they don't you can always rent your own lighting company to bring in. If you venue has them, see if they are included in your package or if they are additional.

2. If you're hiring an outside lighting company, make sure to coordinate with the venue so they have access to enter and setup. Lighting setup usually takes longer than other vendors setup time. Make sure your lighting company can have access to the venue and that they can bring in any equipment they need to setup and operate.

3. Before booking, have an in person meeting with the lighting company and ask to see the lighting effects in person. When you ask for pink lighting, their idea and your idea may be different. Make sure you schedule an appointment to see the lighting you're interested in before you book and make any adjustments together so you're on the same page.

4. If you're having a complicated lighting scheme and not just a few strings of lights, ask if the lighting company provides an onsite attendant to supervise the lights and make any adjustments needed. You should also inquire about if there will be any setup or tear down fees.


Previous Post :: Budget Breakdown :: Venue Rental


Wednesday, October 25, 2017

Planning Tips :: Wedding Budget Breakdown :: Flowers + Decor

Flowers and décor show your personality and help set the ambiance for your event, but they can be a significant portion of your budget. Here is the breakdown of what you need, some additional options, and cost saving tips to help ease the cost of your wedding flowers!

Suggested percentage of the budget for your flowers and décor is 15%. If you're wedding budget is $20,000, your floral and décor budget would be $3,000. Keep in mind that if you're not accessing other areas of the budget (for example, if you're not using hired transportation for the event...add that percentage of the budget to your floral and décor percentage so you can have a higher budget for flowers.


Photo by EM Event Photography :: Bouquet by Michéll Events


Bouquet by Michéll Events


Personal Flowers
Bridal Bouquet
Tossing Bouquet
Maid of Honor Bouquet
Bridesmaids Bouquets (x number of bridesmaids)
Junior Bridesmaids Bouquets (x number of Jr. bridesmaids)
Flower Girl Accessories (Crown, Basket, Petals, etc...)
Corsages for Women (x number of corsages needed)
Boutonnieres for Men (x number of boutonnieres needed)


Photo by Rosen-Jones Photography :: Wreath by Michéll Events


Cake Flowers by Michéll Events


Additional Flowers (Optional)
Aisle Décor
Archway/Alter Arrangements
Table Centerpieces
Cocktail Tables
Escort Card Table
Buffet Tables
Bar Arrangements
Foyers/Entrances
Restrooms
Stage Décor
Sweetheart Table
Cake/Cake Table


Centerpiece & Linens by Michéll Events


Photo by LMAC Photography :: Centerpiece by Michéll Events


:: TIPS ::

1. To cut down on centerpiece costs, use a mix of small and large arrangements. Not only does it save on the overall cost, but it adds dimension and variety to the décor of the reception which is always a good thing!

2. See if it's an option to re-use your ceremony flowers at the reception. If you're not required to leave them or donate them at the ceremony location, you can have your florist, wedding planner, friend or family member move them to the reception location before the guests arrive.

3. Check to see if there are any delivery fees for your florist or décor. These charges will be in addition to the flower cost and should be taken into consideration for your budget.

4. Make sure you're using seasonal available flowers in your arrangements to be most cost effective. If you have a certain look or style you like but it's over your budget, check into having arrangements made from more cost-effective seasonally available options of the same color or shade.


Previous Post: Planning Tips :: Budget Breakdown :: Food + Beverages


Thursday, August 10, 2017

DIY :: Easy Twig Letters

This is a completely easy project and looks amazing when it's finished! Not to mention cheap...you can probably find twigs in your front or back yard anytime! You can make these for your rustic wedding, your fireplace mantel at home, or any other spot you need a touch of natural décor!


Supplies:

Wooden Letter from any craft store in the size you want
Hot Glue Gun & Glue Sticks
Twigs
Garden clippers for trimming twigs


Start with your wooden letter and lay the twigs out over it. Trim them to the length needed, then hot glue them to attach. Repeat until done from top to bottom! You may have to overlap a few to cover any gaps where you can see the letter through the twigs.


See the full post at The Happy Housie.


Sunday, August 6, 2017

DIY :: Papier-Mâché Style Twine Lanterns

Love this project! These are totally perfect for an evening event, whether indoor or outdoor! You can make them in any size or any shape that you want. This particular project uses balloons of different sizes to make round lanterns, spray paint them white and add white string lights to add the glow effect. You can personalize it even further depending on your event style and theme!

See the full article at Splash of Something.

Fair warning, this is a super duper messy project — like you’re-hands-will-be-covered-in-sticky-goo-and-your-work-space-will-be-speckled-with-gluey-drops-of-glueness kind of messy — but the mess and cleanup are well worth the effort. Just invest in a cheapo plastic drop cloth and a pair of plastic gloves, and it’s not too big of deal.


Here’s what you need for the lanterns:

• 5 to 6 balloons, blown up to whatever size ball or lantern you want to make
• large plastic drop cloth
• scissors
• twine, hemp or cotton yarn (I used hemp because it seemed a little tougher for outdoor use, but next time I might go the white yarn route for a lighter, brighter look.)
• 4 ounces basic white glue
• ½ cup cornstarch
• 1/4 cup warm water
• petroleum jelly
• clear, fast-drying spray paint
• lantern lights or white twinkle lights (I like the twinkle lights because they have that twinkly, magical look, but lantern lights would be nifty, too.)


Blow up balloons to desired size. Keep in mind that the size of your balloon dictates the size of your lantern balls (it’s also helpful not to blow up the balloons all the way; a bit less air makes for rounder balloons).

If you plan to place a lantern light in your finished lanterns, draw a circle on the top of each balloon large enough to accommodate the lighting fixture. If you’re not planning to light the lanterns or you’d prefer to stuff them with a simple strand of twinkle lights, you can skip this step (just make sure you leave enough space while wrapping to stuff the twinkle lights inside).


Lay a plastic drop cloth over your work surface, and set up a place where balloons can be suspended from the air to dry. I draped the plastic drop cloth across the bathroom floor and into the bathtub so I could hang the balls on the shower bar.

Mix glue, cornstarch and warm water in a large container until all lumps are gone, then cover each balloon in petroleum jelly (using rubber gloves for this cuts down on the mess).


Feed the twine through the glue mixture until it is coated, then start draping it around the balloon. Wrap the ball vertically to a comfortable tightness, then horizontally. Once ball is wrapped to your liking, use a piece of twine to suspend it from the shower bar (or drying space of your choosing).


Allow balls to dry for 24 hours. Then, pop the balloons. It’s like magic! Spray the balls with clear, fast-drying spray paint. Once they’re dry, insert the lights, and you’re ready to party like it’s 1999! Woot!